Showing posts with label Nursery. Show all posts

Monday, April 4, 2011

Liam's Nursery

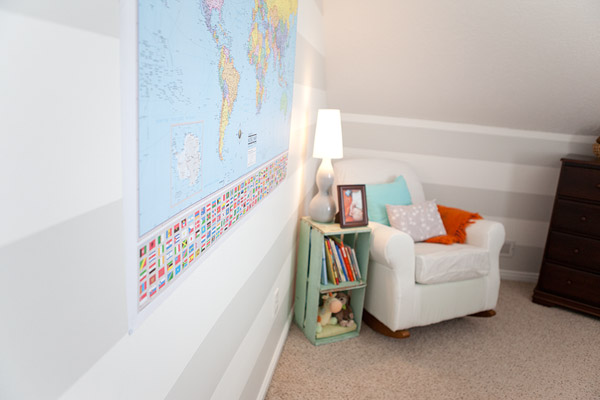
Due to my friend Danielle's request... here is Liam's Nursery! I posted some BEFORE photos from when it was Oliver's nursery way back when (tear). The before photos were right after we had moved in. The green was from the previous owners as were the drapes. And even though green is my favorite color, I of course had an itch to paint it. When I told Brett I wanted to do stripes he was totally up for it, that is until he started the process. Ugh, it was grueling. But SOOOO worth it, and he agrees. I love how open and fresh the white and gray paint makes the room feel.

I also wanted new bedding but didn't want to pay the big bucks for something that Liam would grow out of so soon. So I pulled out my handy dandy sewing machine and got working! I made the drapes, crib skirt, fitted sheet and pillows, as well as a cute little stuffed bunny. I opted to not make a crib bumper. I wasn't aware of the chance of suffocation with a bumper when we had Oliver, hence he had one. And even though Oliver is alive and well I just couldn't do it. I'm a worry wart and I would be getting up every 15 minutes to check on Liam. I think bumpers are adorable and I don't think other parents are bad for having one. The risk just wasn't worth it to me. So long story short, we don't have a bumper for Liam. :)

The Rocking chair is the same one I just took off the yellow slipcover. I plan on making a slipcover myself, but we'll see if that really happens. I might just take it to my friends dad who really knows how to do it. I had to buy a new dresser since we moved the white dresser and bookshelf in Oliver's room. I realized I like having a shorter dresser now from having Liam's taller one but oh well. And remember how I said I wanted a map in the nursery! Well I got one! Brett and I both want to find a better one but this one will due for now.


My favorite thing about the nursery is the lamp. I love the shape and the fact that it dims! I also love the fabric, especially the fitted sheet.

THE COLORS:
Orange, teal, white, and gray.

THE GOODS:

1. Crib and Dresser JCPenney
2. All fabric Quilter's Haven in Bountiful UT.
3. Green high chair and bookshelf, thrift store.
4. Sheepskin Rug IKEA
5. Wall Shelves and Curtain Rod/Clips Target.
6. Map, Office Max
7. Rocker, Downeast Outlet
8. Orange Throw IKEA
9. Lamp IKEA
10. Piggy Bank, Tai Pan
11. Sleep Sheep- white noise maker, Grandma Kelly
12. Canoe Basket the stuffed animals are in ROSS

before
before
before
Look at that tiny boy! What a smile!
wait for it.....

after


Loved this fabric!

Oliver left his mark. This was done with his TEETH!


I love lamp. ;)


Love the pop of orange.

This was not planned. Amazing how matchy matchy this book is to the room. Also, notice the fitted sheet, my favorite fabric of all.


I love putting our extra change in the kids piggy banks.

Our ever growing book collection, mainly because of Gaga! Thank you!

What would we do without our Sleep Sheep.

I am such a fan of clips with drapes, and new hardware.

Friday, March 25, 2011

Simple Nursery

I LOOOOVE the huge map in the nursery idea, along with unique animal pictures. Oh the places you'll go and things you'll see.

*Photos courtesy of Kenziepoo

Rugged Nursery.

I'm still trying to put the finishing touches on Liam's nursery before I post pictures of it and so I'm still searching for ideas. The thing I love about this nursery is how rugged and simple it feels. I love the bold splashes of color on the ceiling and blanket/decor. I am so going to add a chalkboard to the nursery and now probably to Oliver's room too! And I think the ceiling light is A-MAZ-ING!
 
*photo courtesy of Project Nursery

Monday, January 31, 2011

Nursery Design : Flag Banner Project

We are so close to finishing the nursery with the exception of some art projects to put up on the walls. Since I sewed Liam's crib bedding and drapes I had some left over fabric. Since the walls are striped I didn't want anything on the walls to be too overwhelming. I figured this flag banner would be simple and would help tie the room together. It was really easy. The most time consuming thing was sewing which took 15 minutes.
 
Tools needed:
fabric
ribbon or twine
cutting mat
cutting ruler
template (I made mine out of cardstock)
fabric pencil
sewing machine -or- you can hand sew


1. gather your fabric.
2. cut your template. I folded some cardstock paper in half cut a triangle. Make it however big or small you would like. *note: about .5" will be folded over the twine so it will become smaller.
3. I wanted a few of the same color so I folded the fabric over. Trace the template on the backside of the fabric. Use the rotary cutter and ruler ( I know I'm not using their correct names ) and slice. If you use scissors it is a little more tricky.

4. If you work on it in the family room, your kids will want to join.

5. I sewed 1/4" down the sides for extra detail.
6. Pin it over the twine. I actually ended up folding more over so my sewing machine didn't have to feed the twine through.

7. Sew along side of the twine so that you can move the placement of each flag.
8. Make a know on the ends to hang.

9. Enjoy!


Thursday, January 27, 2011

Nursery ideas : Closet

I'm working on getting the Nursery put together so I have been looking around for inspiration for the finishing touches. I came upon these images from Project Nursery and loved how pretty the closets were. Right now the closet in the Nursery is a horrible mess, but I'm hoping to get it to look awesome.

Though I will def not deal with wall paper in the closet I thought it looked so cute for one that is always exposed. 


I am such a basket-aholic. The photos below will be more like something I am looking to do in the nursery. You can never have enough baskets. That's my motto, well one of them. :)

*photos courtesy of Project Nursery